
Smartlinks
Kornit X's smartlink apps are provided in the form of a URL which can be embedded via an iframe into your website.
Different apps layouts exist and you may require different URL parameters depending on your use case.
The below URL is a bare bones example of our standard offering:
https://g3d-app.com/s/app/acp3_2/en_GB/default.html#p=1007644&r=2d-canvas&d=COMPANYREFID
It is highly recommended that HTTPS is used. However, the personalisation apps can be loaded via HTTP as well if needed.
Please take note of the use of the hash (#) rather than the traditional question mark (?).
You may encounter our legacy app URL format (i.e. https://legacy.custom-gateway.net/acp/app/?l=acp2). Whilst the legacy format will continue to work for the foreseeable future its usage is strongly discouraged.
The URL can be broken down into a few key parts:
Part | Description |
|---|---|
| The app that you would like to use |
| The app locale |
| The app configuration |
| The ID of the product to load |
| The renderer to use. Typically this would either be |
| Your unique company reference ID |
It is recommended that you store the entire app URL as its own text field rather than providing a separate text field for each parameter and then dynamically building the final URL. Storing the URL in its full form allows you to more easily deal with URL format changes or additional parameters in the future.
Don't forget to replace COMPANYREFID with your unique company reference ID
Adding to Cart
When a user clicks on an "Add to Cart" button within a personalisation app, the app will create a "print job" which represents the user's design.
Subsequently, the app will then use the postMessage API to send an ADD_TO_CART_CALLBACK event to the parent window.
You will need to add a JavaScript message handler to the parent window that listens for the ADD_TO_CART_CALLBACK event. The handler should add the item to the user's shopping cart and store the value of the printJobRef field.
To allow the postMessage API to function, 3 Smartlink iframe URL parameters are required.
Name | Description |
|---|---|
| The origin of the parent window (i.e |
| A random string. |
| Should always be set to |
The meo and mei URL parameters are used to ensure that the parent window only acts on messages from the correct iframe instance. The app will not send messages if either meo and mei are not specified. For security reasons it is also important to ensure that the message is from the g3d-app.com origin.
An example of the event handler is provided in the HTML below.
<!DOCTYPE html>
<html>
    <body>
        <iframe style="border: 1px solid red; width: 100%; height: 50px;" src="" id="app"></iframe>

        <script>
        let iframeOrigin = "https://g3d-app.com";
        let iframeUrl = iframeOrigin + "/s/app/acp3_2/en_GB/default.html#p=1007644&r=2d-canvas&d=COMPANYREFID&a2c=postMessage";

        let meo = location.origin;
        let mei = Math.random().toString(16).substr(2);

        window.addEventListener("message", e => {
            if(e.origin == iframeOrigin && e.data.id == mei) {
                switch(e.data.name) {
                    case 'ADD_TO_CART_CALLBACK':
                        var printJobRef = e.data.body.items[0].ref;
                        console.log(printJobRef);
                        break;
                }
            }
        });

        let iframe = document.getElementById('app');
        iframe.src = iframeUrl + "&meo=" + meo + "&mei=" + mei;
        </script>
    </body>
</html>
On line 8 of the above example, replace COMPANYREFID with your sales channel company ref ID.
The event's data contains a separate item for each print job that was created. Usually, each item would be added to the cart separately however you may wish to consolidate them depending on your exact use case.
Each item element of the data property contains the below fields.
Name | Type | Description |
|---|---|---|
| string | The unique reference code for the created print job. |
| string | The product's SKU. This should only be needed if the smartlink contains a product selector. In single product mode, your event handler should already know which product to add to cart. |
| array | A collection of thumbnails for different views of the product (including the user's design) |
Ensure that you store printJobRef as it will be needed when submitting an order later on.
Restoring a User's Design
If you wish to allow the user to edit their design later on, it can be loaded again by passing the value of printJobRef back to the personalisation app via the pj (print job) URL parameter.
For example:
https://g3d-app.com/s/app/acp3_2/en_GB/default.html#p=1007644&r=2d-canvas&d=COMPANYREFID&a2c=postMessage&meo=...&mei=...&pj=CF921CF10F59B3A258
When the user clicks "Add to Cart" again in the app, the ADD_TO_CART_CALLBACK event will be called as normal but with a new value for printJobRef.
Saving
This section is optional
A user can save their design, allowing them to reload it at a later date. You need to provide a callback URL which the user is redirected to after saving. The callback URL allows you to record the information needed to reload the user's design.
The way in which a user can save is app dependent. The following instructions assume you are using the standard acp3_2 app.
The following URL enables the save button:
https://g3d-app.com/s/app/acp3_2/en_GB/mt217h0kr51b1wh.html#p=1007644&r=2d-canvas&d=COMPANYREFID&save=https://example.com/save-callback
Don't forget to replace COMPANYREFID and the callback URL with your own values!
The URL scheme for your callback URL should match the URL scheme that the app was loaded using. For example, loading the app via HTTPS means your callback URL must also be HTTPS.
Handling The Callback
Once the user has clicked save, the app will make a application/x-www-form-urlencoded form POST to your callback URL.
The POST will include a data field, the value of which is a JSON encoded object (example below).
{
  ...,

  "created_from": "https://g3d-app.com/s/app/acp3_2/en_GB/mt217h0kr51b1wh.html#p=1007644&r=2d-canvas&d=COMPANYREFID&save=https://example.com/save-callback",
  "ref": "44EEEA752F59C3A3B1",
  "thumbnails": [
    {
      "name": "thumbnail",
      "url": "https://g3d-app.com/u/product-state/44/EE/EA/75/2F/59/C3/A3/B1/thumbnails/thumbnail.png",
      "description": ""
    },
    {
      "name": "thumbnail_60",
      "url": "https://g3d-app.com/u/product-state/44/EE/EA/75/2F/59/C3/A3/B1/thumbnails/thumbnail_60.png",
      "description": ""
    }
  ],
}
The object will contain many fields, the most important of which are:
Name | Type | Description |
|---|---|---|
| string | The original app URL |
| string | A unique reference code needed to reload the user's design |
| array | A collection of thumbnails for the user's design which you might like to display somewhere |
The default thumbnail is named thumbnail. Other thumbnails for different views may be included depending on the product.
Reloading The Saved Design
The user's design can subsequently be loaded by taking the value of the created_from field and appending &ps= and the value of the ref field. For example:
https://g3d-app.com/s/app/acp3_2/en_GB/mt217h0kr51b1wh.html#p=1007644&r=2d-canvas&d=COMPANYREFID&save=https://example.com/save-callback&ps=44EEEA752F59C3A3B1
Pricing (EPA)
Our Personalisation apps provide the ability to show pricing as well as allowing the user to input a purchase quantity. This information is than pulled from an external URL and is then know as the External Pricing API (Or EPA for short). There are 2 types of EPA which work with new pricing and that is either "Single Product Mode" or "Multi Product mode". This works in conjunction with "Pricing" set up against products.
What is the "Single Product Mode"?
In single product mode, the URL specified by the EPA Parameter is called by the personalisation app. Meaning it is possible to use a different URL for each individual product you want to use from platform by changing the parameter.
What is the "Multi Product Mode"?
The Multi Product mode (which is when a product menu is visible) is when the app will take the EPA URL and append a SKU parameter to the end of it before retrieving information. The value of the SKU parameters likely to be the SKU of the product that is selected by the user. This SKU comes from the KornitX Platform and is typically in this case the fulfiller SKU.
How Do These Work?
This works with both single and multi options, the product information is retrieved via a JSONP API, the URL of this is passed to the app via the EPA URL parameter. The EPA API must return a JSONP encoded object with the following fields:
Price
Name
Description
How Can I set An EPA With New Pricing?
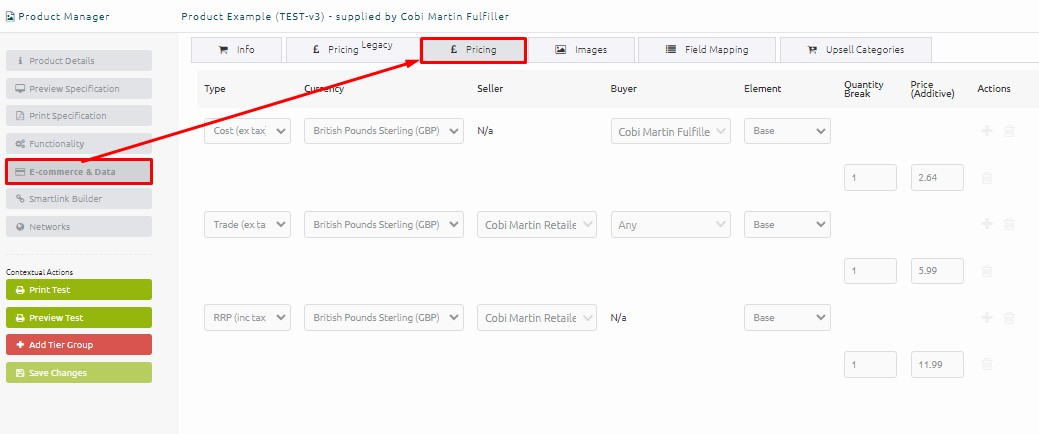
Well, to begin with you need to ensure the product you are updating has pricing set up within the "Pricing" menu as shown below. In this example we can see the cost, trade and RRP pricing has been set against the product which means we can use the EPA based on the products pricing setup. If your products are missing pricing, the actual EPA setup will fail so this needs to be set up.
Once we have set the pricing we can head to either "App Defaults" to make a legacy link or to "Smartlink Builder" to select our chosen app, and adding the needed EPA to the product which is set like this - https://app.custom-gateway.net/api/p/3/epa-v2/:productRef/s/159121/b/any/c/GBP/pt/1
Below is a breakdown of this app link, please take this into account with the above link
The `s` parameter is for the seller company ID (this is set at the example 6 digit ID)
The `b` parameter is for the buyer company ID (set as "any" for our example)
The `c` parameter is for the currency code (Set as "GBP" for our example)
The `pt` parameter is for the price type (In our example this is 2 which is RRP.)
Regarding the pricing type, each type of pricing has a numerical value as detailed below.
Cost - 0
Trade - 1
RRP - 2
Retail - 3
Carriage - 4
Pulling Of Virtual Pricing From A Blank
Pricing EPA has been updated to ensure that for any Virtual products that do not have any pricing information set, the use of the Pricing EPA in a smartlink will ensure a price is gathered from the Blank product of which the virtual is made from. This has reduced the need to set virtual pricing on products as with the use of the Pricing EPA, a price will always be set as long as a blank contains this data.
To set this, simply set add the following "i" paremeter, standing for "Inherit pricing from base product". This will appear at the end of the smartlink like the following example - "i/1"
This a huge change to Pricing EPA tand they key change is the fact products can pull pricing from their blank which from a workflow production vastly speeds up the process.
postMessage API
In addition to the ADD_TO_CART_CALLBACK event, Smartlinks also emit other events.
Currently the full list of available events is undocumented and we do not provide any guarantees to their future behaviour unless the event in question is described in this document.
IFRAME_RESIZE
window.addEventListener("message", e => {
    if(e.origin == iframeOrigin && e.data.id == mei) {
        switch(e.data.name) {
            case 'IFRAME_RESIZE':
                iframe.style.height = e.data.body.height + "px";
                break;
        }
    }
});
The IFRAME_RESIZE event can be used to automatically resize the iframe on your site so that all content fits within it without the need for scroll bars within the iframe.
Whilst the IFRAME_RESIZE event exposes both a width and a height, you should only automatically resize in one dimension, keeping the other dimension static.
The code example sets a very small height to aid in demonstrating how the auto resize works. Its best to start with a much larger height to begin with.